The Anatomy of a Mechanical Failure: Why Your Crank Is Failing
I recently sat across from a ‘Glib Closer’—one of those high-pressure sales reps who could sell a screen door to a submarine captain. He was trying to convince a homeowner in the suburbs that their entire set of ten-year-old casements was ‘thermally compromised’ and needed a full $45,000 replace windows project. All because three of the cranks were stripping. I had to step in. I pulled the operator cover off and showed the homeowner the actual culprit: a simple stripped worm gear caused by years of over-tightening against a dirty track. A $40 part and twenty minutes of labor saved them a fortune. Most installers today don’t want you to know how to maintain your operable units; they want to sell you the ‘next generation’ of vinyl that will expand and contract like an accordion the moment the thermometer hits ninety degrees.
Understanding the 2026 Casement Standard
By 2026, the industry has shifted toward high-compression seals. Unlike a sliding window that relies on brush seals (which are essentially hair on a stick), a casement window functions like a refrigerator door. When you turn that crank, the sash is pulled tight against a continuous bulb seal. This is why casements are the preferred choice in cold, northern climates where the U-Factor—the measure of heat transfer—is the only number that keeps your heating bill from looking like a mortgage payment. However, that high-compression seal puts immense stress on the mechanical operator. If the rough opening isn’t perfectly square, or if the shim placement has shifted over time, that crank has to work twice as hard to pull the window into its seat.
“Mechanical fasteners and hardware must be maintained to ensure the air-tightness and water-shedding performance of the fenestration assembly. Failure to lubricate or align hardware can lead to seal failure and frame degradation.” – AAMA Installation Masters Guide (AAMA 907-05)
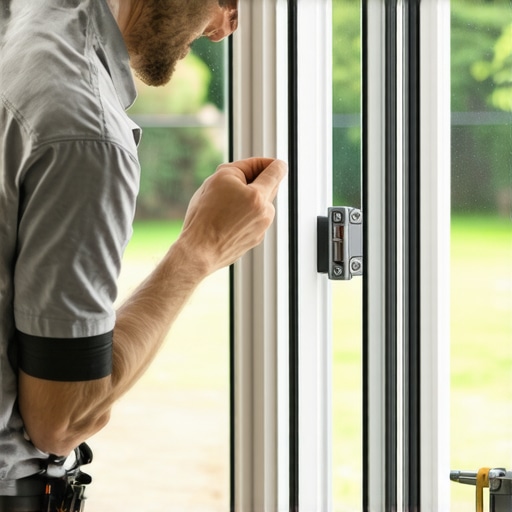
Step 1: The Forensic Inspection of the Sash and Track
Before you reach for a screwdriver, you need to understand why the crank is resisting. Open the window as far as it will go. Look at the glazing bead—the strip that holds the glass in the frame. If it’s popping out, it might be catching on the frame. More importantly, look at the track at the bottom of the sash. This is where a professional window cleaner becomes your best friend. Debris, dead insects, and hardened grease in this track act like speed bumps for the nylon rollers. Use a high-quality window cleaner or a denatured alcohol solution to strip away the old, oxidized grease. If the roller can’t glide, the worm gear in your crank housing will eventually strip its teeth trying to force the movement.
Step 2: Clearing the Debris and ‘Glazing Zooming’ the Operator
Let’s talk about the physics of the operator. The crank handle turns a worm gear, which meshes with a larger gear attached to the swing arm. In 2026 models, these are often made of die-cast zinc or stainless steel. When the sash gets heavy—especially with triple-pane glass and argon gas fills—the torque required to move that arm increases exponentially. I’ve seen homeowners snap the torque bar because they didn’t realize a small pebble was lodged in the weep hole or the track. Clean the track with a stiff brush and ensure the muntins aren’t misaligned and clipping the frame during the closing cycle. A drop of dry-film lubricant (avoid WD-40, as it attracts dust like a magnet) on the pivot points will do more for your window’s longevity than a decade of ‘warranty’ checks from a salesman.
Step 3: Extracting the Stripped Operator
If the handle spins but the window doesn’t move, your gears are gone. You’ll need to remove the operator. This usually involves popping off the plastic cover and unscrewing the base from the sill. This is where you see the difference between a pro and a ‘caulk-and-walk’ guy. A pro checks the sill pan for any signs of moisture. If there’s water sitting under your operator, it means your flashing tape or the exterior drip cap has failed. The mechanical failure is just a symptom of a larger water management crisis. Once the screws are out, slide the arm out of the sash track. If it’s a ‘Truth’ brand or similar high-end hardware, the model number will be stamped on the underside. Match it exactly; there are no ‘universal’ fits in the world of high-performance glazing.
“The integrity of the window seal depends heavily on the uniform compression of the weatherstripping, which is dictated by the mechanical alignment of the sash. Misalignment of 1/16th of an inch can increase air leakage by 40%.” – ASTM E2112 Standard Practice
Step 4: Re-Squaring and the Shim Test
When you install the new operator, don’t just screw it down and walk away. This is the window repair step most people skip. Close the window slowly. Does the sash enter the frame squarely? If the top corner hits before the bottom, the window is out of square. You may need to adjust the hinges or slightly shim the frame behind the operator to tilt the sash back into alignment. In cold climates, this is critical. A casement that doesn’t seat perfectly allows warm, moist indoor air to hit the cold glass surface, leading to condensation. This isn’t a ‘sweating’ window problem; it’s a physics problem. By ensuring the crank pulls the sash into even compression against the bulb seal, you maintain the U-Factor and prevent the rot I’ve seen destroy rough openings across the country.
Thermal Logic: Why Casements Fail in the North
In northern regions, the enemy is heat loss. We use Low-E coatings on Surface #3 to reflect heat back into the room. If your casement crank isn’t pulling the window tight, you are effectively negating that expensive coating. Air infiltration is the ‘silent killer’ of energy efficiency. A gap the size of a credit card around your sash is equivalent to having a brick-sized hole in your wall. When I perform a window repair, I’m not just fixing a handle; I’m restoring the thermal envelope of the home. Don’t let a salesman tell you that a mechanical issue requires a full replace windows order. In 90% of cases, the frame and glass are fine; the ‘engine’ (the hardware) just needs an overhaul.
Final Maintenance Tips for the 2026 Homeowner
Keep your tracks clear, use a non-silicone window cleaner to maintain the clarity of your Low-E glass, and never force a crank. If it feels stuck, it is stuck. Forcing it will only strip the zinc gears and leave you with a window that won’t lock. A properly maintained casement should be able to be closed with a single finger on the crank. If you’re using your whole arm, you’re doing it wrong. Respect the mechanics, and your windows will respect your energy bill for the next thirty years.
This post hits on such an important aspect of window maintenance that many homeowners overlook—particularly how a simple issue like debris in the track or a misaligned sash can significantly impact energy efficiency and window lifespan. I’ve seen cases where people kept forcing their cranks, unknowingly causing gear damage, which could have been avoided with a quick inspection. One thing I would add is that when replacing the operator, it’s really worth checking the entire track and hinge alignment first, because even a perfect replacement won’t solve problems stemming from misalignment. Has anyone found that regular lubrication and track cleaning significantly extend the life of these high-compression seals? I’d love to hear some practical tips from others on maintaining these windows without always needing professional help. Proper maintenance might seem simple, but its impact on preventing costly repairs and energy loss is truly invaluable.