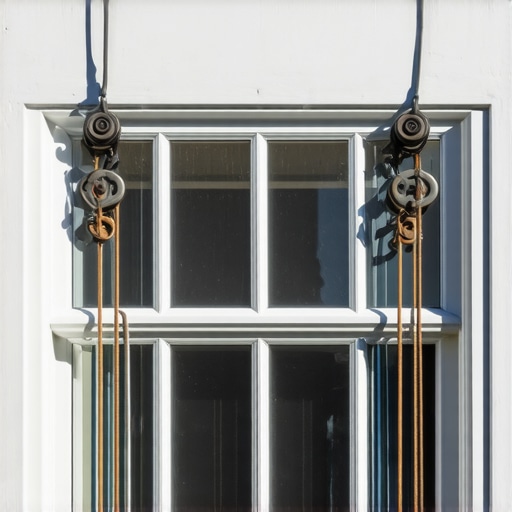
The Anatomy of a Failing Sash: Beyond the Surface
In my twenty-five years of staring through glass, I have seen thousands of homeowners mistake a mechanical failure for a structural one. A sash window is a beautiful piece of engineering, a balanced system of gravity and friction that has survived for centuries. But when that balance shifts, the window becomes a liability. A homeowner called me in a panic because their new windows were sweating. I walked in with my hygrometer and showed them the humidity was 60 percent. It wasn’t the windows; it was their lifestyle and the fact that their previous sash windows had such high air infiltration that the house was accidentally ventilated. Once they sealed the building envelope with tight replacements without addressing interior moisture, the glass became the sacrificial surface for condensation. This is the reality of the thermal envelope. If you are struggling with a sash that won’t stay up or a cord that has snapped, you are dealing with more than a nuisance; you are dealing with a break in your home’s air barrier. Proper window repair starts with understanding the mechanical physics of the weight pocket and the sash cord. We are not just talking about a window cleaner wipedown; we are talking about restoring an operable system to its original tolerances.
“Installation is just as critical as the window performance itself. A high-performance window installed poorly will fail.” AAMA Installation Masters Guide
The Weight of the World: Understanding the Pulley System
The double-hung sash window relies on a counterweight system hidden within the wall’s rough opening. Inside those hollow cavities, cast iron or lead weights are suspended by sash cords over a pulley. When the cord frays or the pulley seizes, the system fails. A common mistake in the replace windows versus repair debate is assuming a broken cord means the frame is dead. It isn’t. The cord itself is usually a number 8 or number 10 braided cotton with a synthetic core. The synthetic core prevents stretching, while the cotton exterior provides the necessary friction against the pulley wheel. If you see a nylon rope in there, you are looking at a hack job. Nylon stretches under the constant load of a fifteen-pound sash, leading to a window that won’t close fully, leaving a gap at the meeting rail that kills your U-factor. We talk about the U-factor frequently in the North because heat loss is our primary enemy. A gap of just one-eighth of an inch at the meeting rail can allow more cold air into your home than a single pane of glass loses through radiant transfer. You need to ensure the sash sits perfectly square against the sill to maintain the thermal break.
Technical Execution: Accessing the Weight Pocket
To begin a real window repair on a sash system, you must first remove the stop beads. This is where most installers fail. They use a pry bar and splinter the wood. I use a sharp utility knife to break the paint seal and a broad-blade stiff putty knife to gently ease the bead away from the jamb. Once the stop bead is removed, the lower sash can be swung out. This exposes the weight pocket cover. Many historic windows have a small panel held by a single screw or simply wedged into place. If your windows have been painted shut for decades, you will need to carefully excavate this panel. This is the heart of the machine. Inside, you will find the weights. If the cord is snapped, the weight will be at the bottom of the pocket, likely buried in decades of dust and debris. This is the time to check for rot. If you see moisture at the bottom of that pocket, you have a flashing problem or a lack of a proper sill pan. Water follows the path of least resistance, and an unsealed weight pocket is a highway for moisture to reach your structural studs. You must ensure the pocket is dry before re-stringing the system.
The Physics of Friction: Pulley Maintenance
The pulley itself is often overlooked. These are typically cast iron or brass wheels. Over time, the axle of the pulley can wear or become clogged with paint and grit. A seized pulley will cause the cord to drag, eventually snapping the fibers. Use a wire brush to remove any paint from the wheel. Do not use heavy grease; it attracts dust and will eventually gum up the works. A light application of dry Teflon spray or a high-quality machine oil is all you need. You want the wheel to spin freely with zero resistance. If the axle is badly worn, the wheel will wobble, causing the cord to jump the track and wedge between the wheel and the housing. This is a common cause of stuck windows. Replacing the pulley requires careful measurement of the housing to ensure the new unit fits the existing mortise in the jamb. If the rough opening has shifted over a century, you may need to shim the pulley housing to keep it plumb. This ensures the cord drops straight down the center of the weight pocket without rubbing against the sides.
“The air leakage rate of a window is as important as its thermal conductance. A window that cannot close tightly is a failure of the building envelope.” NFRC Performance Standards
Glazing and Thermal Logic in Cold Climates
Since we are discussing sash windows, we are usually dealing with older homes in climates where the winter wind is the enemy. In these North and Cold environments, the U-factor is king. The U-factor measures the rate of non-solar heat loss. Lower is better. While a single-pane sash window has a terrible U-factor of around 1.1, you can improve this significantly without a full replace windows project. Adding a high-quality storm window creates an insulating dead air space, effectively mimicking a double-pane unit. However, the maintenance of the sash cord remains critical because if the interior sash does not close tightly, warm, moist air from the house will leak into the space between the sash and the storm window. This results in heavy condensation on the storm window, leading to rot in the primary sash. You must ensure the meeting rail where the two sashes overlap is tight. I often install a high-quality bulb seal or v-strip weatherstripping at this point. This simple window repair can reduce air infiltration by up to 50 percent, making the home feel significantly warmer without changing the historic glass. If you decide to go with a full replacement, you need a triple-pane unit with a warm-edge spacer. These spacers are made of non-conductive materials that prevent the edge of the glass from becoming a cold spot where condensation forms. For our cold climate, ensure the Low-E coating is on Surface number 3 to reflect your expensive furnace heat back into the room.
The Restoration Checklist: Re-stringing the Sash
When you are ready to re-string, use a sash chain for a permanent fix, or a high-quality waxed cotton cord for a traditional feel. The length of the cord is vital. If it is too long, the weight will hit the bottom of the pocket before the window is fully closed. If it is too short, the weight will hit the pulley before the window reaches the sill. To find the correct length, pull the cord through the pulley and attach it to the weight. Lower the weight until it sits about two inches above the bottom of the pocket when the sash is in the fully closed position. Secure the cord to the sash using the existing knot pocket or a heavy-duty clout nail. Always ensure the cord is seated deeply in the groove of the sash side so it doesn’t rub against the jamb. This is where precision matters. A cord that rubs will fray in six months. A cord that runs free will last thirty years. Once the sashes are back in place, check the operation. They should glide with the touch of a finger. If they don’t, check your shims. If the jamb has bowed inward over time, it will pinch the sash. You may need to sand the edges of the sash slightly or adjust the stop beads to allow for more movement. This is the difference between a master glazier and a window cleaner; we understand the tolerances of the wood and the glass.
{“@context”: “https://schema.org”, “@type”: “HowTo”, “name”: “How to Maintain Sash Window Pulleys and Cords”, “description”: “A technical guide to repairing and maintaining the mechanical balance system of traditional double-hung sash windows.”, “step”: [{“@type”: “HowToStep”, “name”: “Remove Stop Beads”, “text”: “Use a utility knife to break paint seals and a putty knife to gently remove the stop beads from the window jamb.”}, {“@type”: “HowToStep”, “name”: “Access Weight Pocket”, “text”: “Open the pocket cover located in the side jamb to access the cast iron weights.”}, {“@type”: “HowToStep”, “name”: “Inspect and Lubricate Pulleys”, “text”: “Clean the pulley wheels of paint and debris, then apply a dry lubricant or light machine oil to the axle.”}, {“@type”: “HowToStep”, “name”: “Replace Sash Cord”, “text”: “Measure and cut new braided cotton sash cord, attach to the weights, and thread through the pulleys to the sash.”}, {“@type”: “HowToStep”, “name”: “Test Balance”, “text”: “Ensure the sash moves freely and stays in place at any height without drifting or crashing.”}]}