The Integrity of the Fenestration Envelope
In the world of high-end glazing, we often focus on the glass and the frame, but the screen is the first line of defense for any operable window or sliding door. Most homeowners look at a tear in their sliding door screen and see a minor annoyance. I see a compromise in the building envelope that invites pests and degrades the airflow dynamics of the room. When we talk about window repair, we are not just talking about the glass. We are talking about the entire assembly, including the screen sash and the tracks that allow for movement. A ripped screen is more than an eyesore, it is a failure of a functional component designed to provide ventilation while maintaining a barrier.
I remember pulling a sliding door out of a beachfront property in South Carolina about ten years ago. The homeowner complained about a sticky door, but when I got the frame out, I realized the subfloor was mush. The previous installer had ignored the sill pan and relied on a massive bead of cheap hardware store caulk. More importantly, the screen had been ripped for months, allowing salt spray to accumulate in the track. That moisture had nowhere to go because the weep holes were clogged with debris. This is why I tell people that even a small tear in a screen matters. It is part of a system that needs to be maintained by a professional window cleaner or a technician who understands how water moves.
“Installation is just as critical as the window performance itself. A high-performance window installed poorly will fail.” AAMA Installation Masters Guide
The Science of Screen Mesh and Tensile Strength
Before you grab any old thread, you need to understand the material science of what you are repairing. Most modern sliding door screens are made of fiberglass mesh coated with protective vinyl. This coating is what protects the glass fibers from UV degradation. When you have a rip, the structural integrity of the weave is gone. Standard sewing thread is useless here. It has zero UV resistance and will snap the first time someone bumps the door. This is why we use fishing line, specifically a monofilament or fluorocarbon line. Fluorocarbon is the gold standard because it has a refractive index similar to water, making it nearly invisible, and it is almost entirely impervious to the sun’s ultraviolet rays. This is the level of technical detail required for a lasting window repair.
When we look at the rough opening of a sliding door, we have to consider the tension across the entire operable panel. A screen is held in place by a spline, a rubber gasket pushed into a groove in the frame. If you try to sew a rip without understanding the tension, you will pull the screen out of the spline, causing the mesh to sag. This creates a gap where the sash meets the frame, rendering the screen useless against smaller insects. You want a 10 to 15 pound test fishing line. It is thin enough to pass through the mesh holes but strong enough to hold the weave together under the stress of the door being slammed or leaned on.
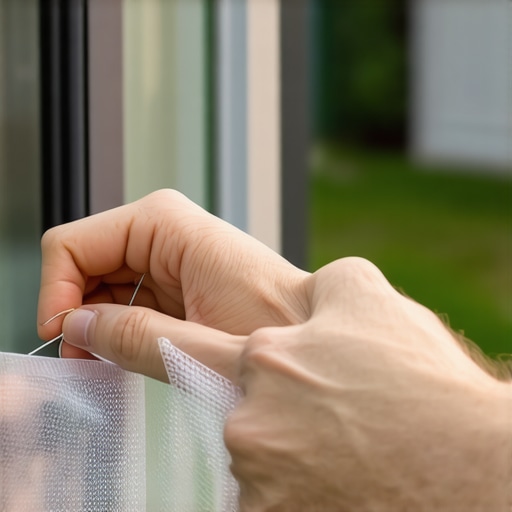
Surgical Repair: Step by Step Technical Execution
First, examine the area around the glazing bead and the spline. If the mesh is brittle, you cannot sew it. It will simply shatter like old glass. You need to test the flexibility of the fiberglass. If it is still supple, you can proceed. Use a curved upholstery needle. A straight needle is difficult to maneuver within the constraints of the door frame, especially if you are performing the repair while the screen is still in the track. The goal is to mimic the original weave of the mesh. You are not just closing a hole, you are reconstructing a grid.
Start your first stitch at least one inch above the tear. This anchors the repair in healthy, uncompromised mesh. Use a surgeon’s knot to secure the fishing line. As you move down the rip, use a whip stitch, but ensure you are catching at least two squares of the mesh on either side. This distributes the load. If you catch only one thread of the fiberglass, the tension will cause it to cheese-wire through the material. This is why many people fail at window repair, they do not account for the load paths within the material itself.
“Standard Practice for Installation of Exterior Windows requires that all components, including screens and secondary storm products, do not interfere with the water shedding capabilities of the primary opening.” ASTM E2112
Climate Context: The Coastal Struggle
In coastal environments like Florida or the Gulf Coast, the enemy is not just the sun, but the salt. A metal screen will corrode in years, not decades. This is why we almost exclusively use fiberglass or specialized pet-resistant polyester. When you repair a screen in these areas, your fishing line must be salt-resistant. A window cleaner will tell you that salt buildup on a screen acts like sandpaper every time the wind blows. If your repair is not flush, the salt will collect in the knots and abrade the surrounding mesh.
Furthermore, in these high-heat zones, the solar heat gain coefficient (SHGC) of your windows is vital. While the screen doesn’t have an SHRC rating like the glass does, it provides a layer of shading. A dark, well-maintained screen can actually reduce the amount of direct infrared radiation hitting the glass surface. This is the type of glazing zooming we need to do to understand how every part of the window assembly contributes to the thermal performance of the home. If you have a massive hole in your screen, you are losing that shading benefit, and you are likely letting in humid air that forces your AC to work harder, leading to condensation issues on the interior glazing bead.
When to Repair vs. When to Replace Windows
There is a point where a needle and fishing line won’t save you. If the screen has more than three significant tears, or if the spline has hardened and popped out of the channel, you are looking at a full rescreening or a total window repair. If you are constantly having to fix the screen because the frame is racking, the problem is deeper. It usually means the house has settled or the rough opening was not properly shimmed. I have seen sliding doors where the header was sagging so much that it was crushing the screen frame. No amount of fishing line will fix a structural failure.
If your sliding door is more than twenty years old and is a single-pane unit, you should not be looking at screen repair; you should be looking to replace windows. The energy lost through a single pane of glass in a southern climate is staggering. Modern units with Low-E coatings on Surface #2 will reflect that heat back outside, keeping your interior cool. When you replace the entire unit, you get a new, factory-sealed screen assembly that operates with the precision of a Swiss watch. Don’t be the person who spends five hours sewing a screen on a door that is leaking air like a sieve and has a rotted sill pan.
Maintenance and Long-Term Care
Once you have finished your repair, the work isn’t over. You need to maintain the tracks. Use a silicone-based lubricant, never a petroleum-based one, as petroleum will attract dust and create a grinding paste that destroys the rollers. A professional window cleaner should be instructed to wash the screens with a soft brush and mild soap. This removes the acidic pollutants that break down the vinyl coating on the fiberglass. If you take care of the screen, the repair you made with the fishing line can last for years. It is about understanding that a house is a system, and every component, down to the monofilament you used to sew a mesh rip, plays a part in the longevity of that system. Avoid the caulk-and-walk mentality. Fix it right, or don’t fix it at all. Knowledge of the muntins, sashes, and weep holes is what separates a master glazier from a handyman. Treat your sliding door with the technical respect it deserves, and it will keep the bugs out and the conditioned air in for another decade. { “@context”: “https://schema.org”, “@type”: “HowTo”, “name”: “How to Fix a Ripped Sliding Door Screen with Fishing Line”, “step”: [ { “@type”: “HowToStep”, “text”: “Inspect the mesh for UV damage and brittleness to ensure it can hold a stitch.” }, { “@type”: “HowToStep”, “text”: “Select a 10-15 lb test fluorocarbon fishing line for its UV resistance and invisibility.” }, { “@type”: “HowToStep”, “text”: “Thread a curved upholstery needle to allow for easier maneuvering in the door track.” }, { “@type”: “HowToStep”, “text”: “Begin a whip stitch one inch above the tear, catching at least two mesh squares for strength.” }, { “@type”: “HowToStep”, “text”: “Secure the end of the repair with a surgeon’s knot and trim the excess line.” } ] }