The Engineering Behind the Weighted Sash
An old-fashioned double-hung window is a masterpiece of Victorian engineering, relying on a delicate balance of gravity and friction. When that balance fails, usually because a sash cord has snapped after decades of service, the window becomes a heavy, dangerous guillotine. To a master glazier, repairing a pull cord isn’t just a maintenance task; it is a restoration of the building’s respiratory system. Before you call a window cleaner or decide to replace windows entirely, you must understand the physics of the weight pocket and the sash channel.
A homeowner once called me in a panic because their 1920s bungalow windows were ‘sweating’ so much the wood was soft. I walked in with my hygrometer and showed them the humidity was 60 percent. It wasn’t the windows failing; it was their lifestyle in a tightly sealed house without proper ventilation. That excess moisture had wicked into the cotton sash cords, causing them to swell, rub against the pulley axle, and eventually snap. The ‘window repair’ they needed wasn’t just a new rope; it was a lesson in dew point management. When the interior air hits that cold single-pane glass, the temperature of the air drops below its saturation point, and liquid water forms. This water runs down the sash, into the cord hole, and rots the system from the inside out.
“Installation is just as critical as the window performance itself. A high-performance window installed poorly will fail.” – AAMA Installation Masters Guide
Anatomy of the Sash System
To fix the cord, you must first understand the Rough Opening and how the window is seated. The Sash is held in place by the Stop Bead on the interior and the Parting Bead between the upper and lower units. These are not merely decorative; they are the tracks that guide the window’s travel. When you remove the stop bead, you are opening the primary seal of the window. If you find the wood is damp, you are likely looking at a failure of the Sill Pan or a lack of Flashing Tape in the original construction, allowing moisture to migrate into the weight pocket.
In northern climates where heat loss is the primary enemy, these old windows are often blamed for drafts. However, the air infiltration usually happens because the Sash no longer sits flush against the Muntin or the meeting rail. A snapped cord means the window isn’t being pulled tightly into the head jamb, leaving a massive gap for cold air to pour in. The U-Factor of a single-pane window is abysmal, often around 1.1, but a well-maintained sash with a tight cord and proper weatherstripping can perform surprisingly well when paired with a quality storm window.
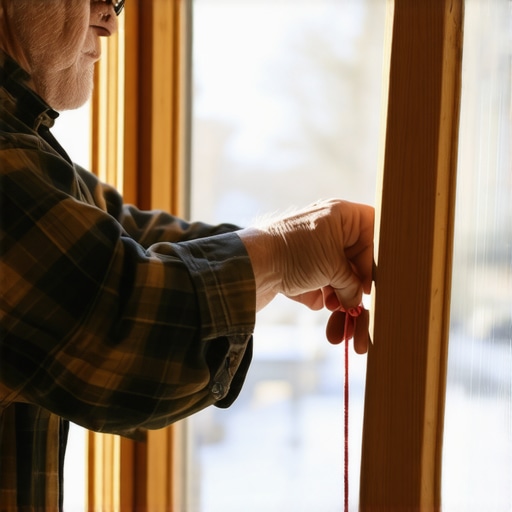
The Restoration Process: A Glazier’s Methodology
Step one is the surgical removal of the stop beads. Use a stiff putty knife to break the paint bridge. If you are reckless here, you will splinter the wood. Once the beads are removed, the lower sash can be swung out. This reveals the access panel to the weight pocket. Inside, you will find the counterweight, usually cast iron or lead. This is where most DIY efforts fail: they use the wrong cord. You need a #7 or #8 braided cotton sash cord with a synthetic core. A purely natural fiber rope will stretch and shrink with the seasons, while a cheap nylon rope will slip on the pulley and eventually melt from the friction of the weight.
Thread the new cord over the pulley and down into the pocket. I use a ‘mouse’—a small lead weight on a string—to fish the new cord through. Once the cord is through, tie it to the weight using a bowline knot or a specialized sash knot that won’t slip under tension. The length is critical. If the cord is too long, the weight hits the bottom of the pocket before the window is closed. If it is too short, the weight hits the pulley before the window reaches the sill. This is the ‘Glazing Zooming’ level of precision required: you are measuring the travel of the sash against the height of the pocket.
“Standard practice for the installation of exterior windows requires that all water-resistive barriers be integrated to prevent moisture intrusion into the rough opening.” – ASTM E2112
Why Repair Beats Replacement
Many ‘tin man’ salesmen will tell you to replace windows the moment a cord snaps. They will pitch you on a Vinyl insert that will expand and contract in the heat, eventually breaking its own seal. A high-quality wood sash, properly repaired, can last another hundred years. When we talk about window repair, we are talking about maintaining the structural integrity of the home. Old-growth wood is denser and more rot-resistant than anything you can buy at a big-box store today. By replacing the cord and ensuring the Weep Hole in the exterior sill is clear, you are preserving a high-performance system that managed heat and light long before Argon gas fills were a marketing term.
If you are in a cold climate, pay attention to the Glazing Bead. If the putty is cracked, the glass is rattling. This rattle is a signal that air is bypassing the glass and entering the Rough Opening. Applying a fresh bead of linseed-oil-based putty won’t just stop the rattle; it will lower your U-Factor by reducing air bypass. It is the combination of the weighted balance and the airtight seal that makes an old window Operable and efficient.
Final Technical Considerations
Before you re-install the Sash, check the pulley. If the axle is squeaking, a drop of 3-in-1 oil is necessary. Do not use grease, as it attracts dust and will eventually seize the mechanism. Ensure the Shim used in the original frame hasn’t shifted, which could cause the frame to bow and the sash to bind. A truly professional repair includes checking the vertical plumb of the side jambs. If the house has settled, you may need to plane the edge of the sash to ensure it moves freely without creating a gap that invites drafts.
Water management is a science, not an afterthought. When the sash cord is functioning, the window closes with a solid ‘thud’ into the Sill Pan, creating a compression seal. This is your primary defense against the elements. If you ignore a snapped cord, you aren’t just losing a window; you are inviting rot into your headers and jack studs. Take the time to do it right, or don’t do it at all.