The Silent Sentinel: Why Your Historic Windows Rattle
If you live in a home built before 1950, you are likely familiar with the distinctive, rhythmic rattling that occurs during a heavy windstorm. To the untrained ear, it is simply the character of an old house. To a master glazier with a quarter-century in the field, that sound is a diagnostic alarm. It tells me that the mechanical bond between your glass and your wood sash has failed. We often focus on the wood rot or the peeling paint, but the most critical component of a historic window is the glazing putty. This material is the only thing standing between your interior comfort and the relentless infiltration of air and moisture.
The Condensation Crisis: A Master Glazier’s Perspective
I recall a specific project in a historic district during a particularly brutal winter. A homeowner called me in a panic because their 1920s-era windows were ‘sweating’ so profusely that water was pooling on the sills and damaging the hardwood floors. They were convinced they needed to replace windows entirely, believing the glass had somehow failed. I walked in with my hygrometer and a small wooden dowel. The humidity in the house was 60 percent, which is far too high for a cold climate, but the real culprit was revealed through the tap test. As I moved from muntin to muntin, the glass didn’t just vibrate, it ‘clacked’ against the wood. The glazing putty had petrified and shrunk, creating a microscopic highway for warm, moist air to hit the cold exterior glass. It wasn’t a window failure; it was a maintenance failure. By performing a targeted window repair instead of a full replacement, we saved the original character of the home and solved the moisture issue at a fraction of the cost.
“Installation is just as critical as the window performance itself. A high-performance window installed poorly will fail.” – AAMA Installation Masters Guide
Understanding the Physics of Glazing Putty
Traditional glazing putty is a simple but elegant mixture of calcium carbonate (whiting) and boiled linseed oil. In a historic operable window, this compound serves three functions. First, it creates a watertight seal at the glass-to-wood interface. Second, it acts as a flexible gasket that absorbs the different rates of thermal expansion between the wood and the glass. Third, it provides structural support to the glass lite. Over forty or fifty years, the linseed oil eventually oxidizes and evaporates. This leaves the putty brittle, chalky, and prone to ‘popping’ out in large chunks. Once the putty is no longer operable as a seal, the window becomes a major source of heat loss. In northern climates, where the U-Factor (the rate of heat transfer) is the primary metric of concern, a loose lite of glass can drop the effective R-value of the window to nearly zero because of air infiltration.
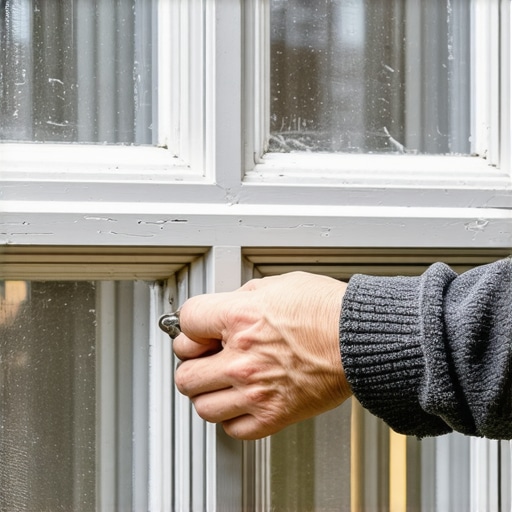
The ‘Tap Test’ Methodology
The ‘Tap Test’ is the most reliable non-destructive method for evaluating the health of your glazing. To perform it, you don’t need expensive sensors. You need a light touch and an observant ear. Take a small wooden tool, like a pencil or a lightweight mallet, and gently tap the center of each glass lite. A healthy, well-bonded lite will produce a dull, solid ‘thud’. This indicates that the bedding putty (the layer behind the glass) and the face putty (the beveled layer seen from the outside) are still integrated and providing dampening. If the lite produces a sharp, high-pitched ‘clack’ or if you can visibly see the glass move within the muntin grid, the bond is gone. This is often the result of the putty pulling away from the wood rabbet, a process accelerated by poor maintenance or the use of an improper window cleaner that contains ammonia, which can degrade the oils in the putty over time.
The Anatomy of a Proper Window Repair
When the tap test reveals failure, the solution is not a tube of caulk. The ‘caulk-and-walk’ installers will tell you that a bead of silicone over the old putty will fix the problem. They are wrong. Silicone is a non-porous material that traps moisture behind it, which will eventually lead to the sash rotting from the inside out. A proper window repair requires the careful removal of the old, brittle putty, cleaning the wood rough opening of the lite, and applying a fresh bed of linseed oil putty. This ensures that the glass is ‘back-bedded,’ creating a permanent air seal. We then apply the face putty at a precise angle to ensure water shed, much like a sill pan protects the base of a modern frame.
“The standard practice for installation of exterior windows requires a continuous seal to prevent air and water infiltration, regardless of the age of the structure.” – ASTM E2112
Climate Logic: Why North vs. South Matters
The urgency of your glazing repair depends heavily on your geography. In cold, northern regions, the enemy is heat loss and condensation. You want to reflect heat back inside, and loose glazing allows that heat to escape via convection through the gaps. In these climates, the ‘Tap Test’ is your first line of defense against ice damming on your sills. Conversely, in the South, the enemy is Solar Heat Gain (SHGC). While a loose window in Phoenix might not ‘sweat’ like one in Minneapolis, it allows hot, humid air to bypass the glass, forcing your air conditioning system to work significantly harder. Regardless of climate, the structural integrity of the glazing bead and putty is what prevents water from entering the wood fibers and causing the sash to swell and stick.
Conclusion: Restoration Over Replacement
Before you listen to a high-pressure salesman tell you that your historic windows are ‘obsolete,’ perform the tap test. Most ‘drafty’ windows are simply windows that need a weekend of maintenance. By replacing failed putty and ensuring your weep hole equivalents are clear, you can achieve thermal performance that rivals modern units when paired with a high-quality storm window. Respect the craftsmanship of the original builder: don’t just replace windows when a professional window repair will preserve the soul of your home for another century.