The Technical Reality of Historical Fenestration
As a glazier with over a quarter century of experience, I have seen the same tragedy repeated on countless job sites: a homeowner looks at a 100 year old wood sash with peeling paint and assumes the unit is dead. They call a high pressure salesman who convinces them to replace windows with cheap vinyl inserts that will fail in fifteen years. In reality, that old growth timber is likely more durable than anything you can buy today. The chipped paint you see is not just an aesthetic failure; it is a breakdown of the sacrificial layer designed to protect the wood substrate from ultraviolet degradation and moisture infiltration. When we talk about window repair in the context of historical sashes, we are talking about managing the moisture content of the wood and ensuring the glazing remains airtight.
The Rot Repair Reality Check
I recall a specific project on a Queen Anne Victorian where the homeowner was certain the lower sashes were beyond saving. I pulled a sash out of the frame and found the bottom rail looked like charcoal. Why? A previous painter had used a high modulus silicone caulk to seal the glass to the wood instead of traditional linseed oil putty. This trapped moisture against the wood fibers with no path for evaporation. I had to use my chisel to find the solid heartwood beneath the rot. It was a classic case of the wrong material being used because someone wanted a shortcut. We ended up performing a Dutchman repair, let in new pieces of vertical grain Douglas Fir, and treated the entire assembly with a borate solution to prevent future fungal growth. This is why understanding the chemistry of your materials is vital.
“Installation is just as critical as the window performance itself. A high-performance window installed poorly will fail.” AAMA Installation Masters Guide
The Physics of Paint Failure and Thermal Stress
In colder northern climates, the sash window acts as a critical thermal boundary. We are constantly fighting the dew point. When warm, humid air from inside the house hits the cold surface of the glass, condensation forms. If your paint film is compromised, that liquid water migrates into the wood through capillary action. During the winter, this water freezes and expands, physically tearing the wood fibers apart and causing the paint to flake off in large scales. This is not just a cosmetic issue; it is a structural threat. When we address window repair, we are looking at the U-Factor of the entire assembly. A single pane of glass has a U-Factor of about 1.1, which is essentially a hole in your thermal envelope. By restoring the sash and adding a high quality storm window, we can bring that number down significantly, often rivaling modern double pane units without losing the historical integrity of the home.
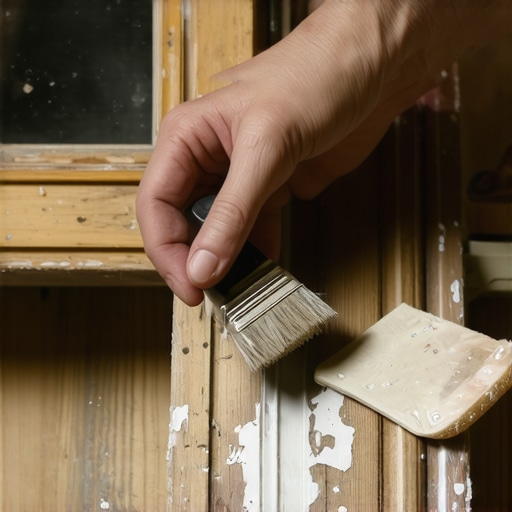
The Restoration Protocol: A Step by Step Technical Deep Dive
The first step in any serious restoration is the removal of the sash from the rough opening. You cannot properly restore a window while it is hanging in the frame. You must disconnect the sash cords, remove the inner stops, and take the unit to a controlled environment. Once on the bench, the real work begins. We use infrared heat strippers to soften the layers of lead based paint. Unlike heat guns, infrared tools operate at a lower temperature that does not vaporize lead, making it a safer choice for historical work. You must strip the wood down to its original profile to inspect the muntins and the glazing rabbet.
After stripping, the wood often looks parched. We apply a mixture of boiled linseed oil and turpentine to feed the fibers. This is the stage where you determine if you need to stabilize the wood with a liquid epoxy consolidant. If the wood is soft but not missing, the epoxy penetrates the cells and hardens, creating a substrate that is often stronger than the original timber. This is a far superior method to simply slopping on wood filler, which will inevitably pop out during the next seasonal expansion cycle.
Glazing and the Art of the Putty Line
The most critical part of the assembly is the glazing bead or the putty line. Traditional glazing putty is a mixture of whiting and linseed oil. It remains flexible for decades, allowing the glass to move independently of the wood sash. When you see cracked putty, it means the oil has been wicked out of the mixture, usually because the wood was not properly primed before the putty was applied. Always use an oil based primer in the glazing rabbet. This creates a seal that keeps the oils in the putty where they belong. Once the glass is set with glazing points, the putty is applied with a stiff knife. This is a skill that takes years to master. The goal is a clean, straight line that is hidden by the interior muntin profile when viewed from the inside. This seal is your primary defense against water. A professional window cleaner will tell you that a well glazed window is much easier to maintain because there are no jagged edges to catch a squeegee.
“The continuity of the air and water barrier is the most important factor in the long term durability of a fenestration system.” ASTM E2112 Standard Practice
Managing the Microclimate
In regions with extreme cold, we focus on the interior surface of the glass to prevent condensation. We often suggest a Low-E storm window. This involves a coating on the number three or four surface that reflects long wave infrared radiation back into the room. This keeps the interior glass surface warmer, which moves the dew point away from the sash and prevents the very moisture that causes paint to chip in the first place. This is the glazing zooming approach: we don’t just fix the paint; we fix the thermal dynamics that caused the paint to fail. We look at the meeting rail and the stiles to ensure they are making firm contact with the weatherstripping. We use bronze v-strip or felt gaskets because they are durable and don’t interfere with the smooth operation of the weighted balance system.
The Replacement Myth and Economic Reality
The marketing machines for replacement windows will tell you that you will save 40 percent on your energy bills. This is a falsehood. The glass is only a small part of the total heat loss of a building. Most air leakage happens at the weight pockets and the rough opening. By performing a high quality window repair, which includes insulating the weight pockets and installing high performance weatherstripping, you can achieve similar energy results at a fraction of the cost. More importantly, you are preserving a material that was designed to be repaired. A modern vinyl window is a disposable product. When the seal fails and the gas fill escapes, the entire unit must be replaced. A wood sash, if maintained, can last for centuries. The economics of restoration are clear when you look at the lifecycle of the building rather than the next five years. When you pay for a professional restoration, you are investing in a permanent solution, not a temporary plastic patch.
In conclusion, restoring chipped paint on an old sash is an exercise in patience and technical precision. It requires an understanding of wood species, paint chemistry, and thermal physics. From the initial scraping to the final application of a high quality topcoat, every step must be performed with an eye toward moisture management. Don’t be fooled by the quick fix. Real window repair is about respecting the craftsmanship of the past while using modern material science to ensure the window performs for the next hundred years. Keep your sashes operable, keep your glazing tight, and never underestimate the power of a well maintained piece of old growth wood.